
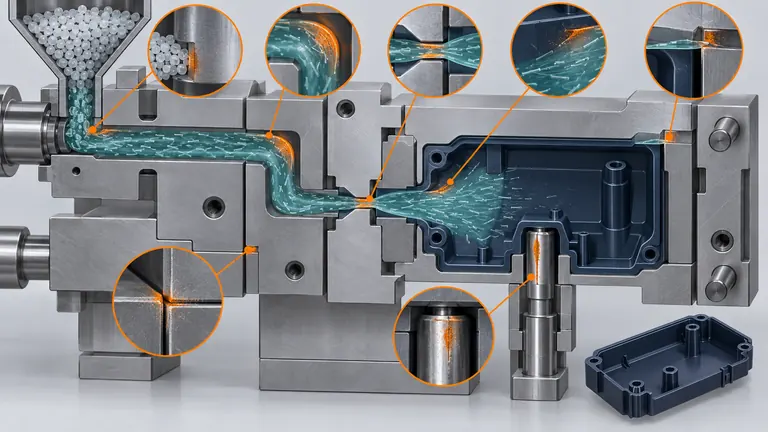
Glass-filled resin can meet stiffness, creep, or dimensional needs while accelerating wear in the plasticizing unit, runner, gate, cavity transitions, vents, shutoffs, and moving details. Waiting for flash or a failed dimension means the tool may already need a disruptive repair.
Map abrasive, impact, pressure, and sliding exposure from machine nozzle to end of fill. Establish cavity-specific baseline dimensions and surface records, inspect high-risk zones at defined intervals, trend parts and process, and maintain replaceable components. Material grade, glass content and form, geometry, speed, steel, coating, and maintenance all change the risk.
Build a wear map from the actual material and flow path
“Glass-filled” is not one wear condition. Short or long fibers, loading, base polymer, additives, reclaimed content, moisture, contamination, and processing temperature influence flow and contact. Begin with the exact approved grade and supplier processing guidance.
Trace the melt path: screw and barrel, check ring, nozzle, sprue bushing, manifold or runner, turns, split points, gates, impingement surfaces, thin restrictions, weld regions, vents, and end-of-fill. Add mechanical interfaces such as parting-line shutoffs, slides, lifters, core pins, ejectors, and textured surfaces. Mark where velocity, pressure, fiber contact, repeated impact, or sliding is expected to be high.
Gate and runner geometry can concentrate abrasion. Small gates and sharp direction changes may increase shear and local contact; direct impingement can erode the opposite steel. Thin core pins can deflect or wear unevenly. Vent edges can round or clog. Shutoffs can wear from both abrasive contamination and mechanical misalignment. A cavity map should link each risk zone to part features and likely symptoms.
Do not infer mold-life numbers from resin family alone. Request the material producer’s current technical and processing data for the exact grade, including recommended temperature and drying. Review planned annual shots, cavitation, color changes, recycled-material rules, and expected maintenance access. If the tool moves between machines, include nozzle and alignment conditions.
DuPont’s educational mold-design overview identifies runner systems, cavity layout, gates, vents, cooling, ejection, and shrinkage as connected design subjects (DuPont mold-design webinar overview). For glass-filled service, use that systems view: wear at one point can change filling, packing, venting, appearance, and dimensions elsewhere.
The wear map should list zone, mechanism, baseline evidence, inspection method, interval trigger, replaceable component, and product reaction. It becomes the foundation for tool design and maintenance budgeting.
Choose steel, inserts, coatings, and geometry by failure mechanism
A harder steel is not automatically the best answer for every location. Toughness, polishability, corrosion resistance, heat treatment, weldability, coating support, cost, and repair strategy matter alongside wear resistance.
For gates, runner turns, and direct impingement surfaces, consider replaceable inserts so high-exposure steel can be serviced without rebuilding a large cavity block. Define insert location, retention, alignment, cooling impact, spare quantity, and dimensional restoration method. Use generous, manufacturable transitions where product and flow requirements allow; remove unnecessary sharp turns or restrictions that concentrate wear.
For shutoffs and moving actions, assess alignment and bearing load separately from resin abrasion. Hard coatings may reduce adhesive or abrasive wear but can crack, delaminate, complicate fitting, or require complete stripping during repair. Confirm substrate, heat treatment, surface finish, edge preparation, coating thickness effect, operating temperature, and repair route with the steel and coating suppliers.
| Tool zone | Likely concern | Design/maintenance evidence |
|---|---|---|
| Sprue, runner turn, gate | Abrasion, erosion, size growth | Baseline dimensions and replaceable insert plan |
| Impingement surface | Local erosion or roughness | Surface record and protected geometry |
| Thin core pin | Deflection, abrasion, breakage | Material, support, spare and replacement method |
| Shutoff/parting line | Flash from wear or misalignment | Contact pattern, fit, lubrication, alignment |
| Slide/lifter | Sliding and contamination wear | Guidance, preload, lubrication, clearance |
| Vent/end of fill | Rounding, clogging, burn/flash | Depth/land record and cleaning method |
The tool designer should document steel grades and hardness requirements for high-risk components, but not claim a universal service life without evidence. Automotive mold-steel selection should consider part volume, resin, appearance, corrosion, repair, and heat treatment together.
Design inspection access. If the gate can be measured only after major disassembly, create a proxy product measure and a planned tear-down interval. Preserve steel-safe or replaceable correction paths where the part tolerance is sensitive to wear.
Establish a measurable baseline before serial production
Wear cannot be trended against memory. Before release, capture the tool and part condition using methods repeatable during maintenance.
Record critical component dimensions: gate land and opening, runner features, shutoff fit, core-pin diameters, slide/lifter clearances, vent depths and lands, and cavity surfaces tied to critical part features. Use suitable calibrated instruments and identify measurement locations. Photographs need scale, lighting, orientation, and feature ID; decorative overview photos are not a dimensional baseline.
Create cavity-specific part evidence from the approved process. Measure weight, critical dimensions, flash-sensitive edges, gate appearance, end-of-fill quality, surface roughness or appearance where specified, and functional assembly. Identify resin lot, condition, machine, process revision, cycle count, and cavity. Save approved samples if the customer and storage conditions permit.
Capture process signatures that may reveal change: fill pressure or position, cavity fill time, transfer, cushion, gate seal behavior, peak pressure, and cycle. These are diagnostic trends, not substitutes for product conformance. A rising pressure can also result from material viscosity, temperature, vent blockage, or machine condition.
Illustrative example—hypothetical, not an AutoMoldingPro project. A multi-cavity connector cover uses a glass-filled polyamide. The baseline includes gate dimensions, end-of-fill vent lands, four core-pin diameters, cavity weights, and connector assembly checks. After a defined shot interval, one cavity’s gate has enlarged and its part weight trends higher while another dimension remains stable. Maintenance replaces the gate insert and verifies the cavity fingerprint before release. The example shows evidence flow, not a predicted interval.
Include screw, barrel, check ring, and nozzle condition in the system baseline when the molder controls that equipment. Machine-side wear can create shot inconsistency or contamination that resembles mold wear. The supplier should separate mold-owned and press-owned maintenance responsibilities.
Approve the baseline record as part of tool and process release so later repair decisions have a controlled comparison.
Inspect by risk, cycles, condition, and product signals
Fixed calendar maintenance alone is weak for abrasive service because production volume and material exposure vary. Combine cycle count, resin run history, known high-risk intervals, and condition signals.
Track shots by mold and, where feasible, by approved material. Record startup, purge, color/material changes, unplanned stoppages, and maintenance. Set an initial conservative inspection interval from design risk and supplier experience, then refine it with observed wear. Do not lengthen the interval only because no customer complaint occurred.
At each level, define what can be checked in press, on bench, and after disassembly. In-press checks may include cavity-specific parts, flash, gate witness, pressure trend, ejection, and visible surfaces. Bench checks add gates, vents, parting line, shutoffs, slides, lifters, pins, cooling, and hot-runner access. Major inspections measure high-risk components against baseline and review coatings or heat-affected repairs.
Link product signals to tool zones. Growing flash suggests parting-line, shutoff, alignment, or clamp issues. Gate vestige and weight change can indicate gate wear or process drift. Burn or incomplete fill may involve vents, gates, material, or machine. Dimensional drift may come from steel wear, cooling, process, or measurement condition. Use the signal to trigger diagnosis, not an automatic repair.
AIAG’s CQI-23 describes molding-system assessment with process control, preventive maintenance, startup, and part inspection/testing elements (AIAG CQI-23). Apply its current licensed requirements and the customer’s control plan where mandated. The specific interval must be justified by the tool’s data.
Keep a wear register with cycles, material, cavity/zone, measurement, photographs, product symptoms, action, removed component, and verification. Trend rates only when measurements are comparable. An apparent dimension change smaller than measurement uncertainty is not proof of wear.
Repair and re-release the tool without losing configuration control
Wear repair can alter gate size, shutoff fit, surface finish, cavity dimensions, cooling, coating, and process. Treat it as controlled restoration or change, not routine polishing without records.
Before repair, contain affected parts and determine the last known good point using cavity and production records. Diagnose the mechanism: abrasive erosion, impact, misalignment, insufficient support, lubrication failure, contamination, corrosion, or process overload. Restoring geometry without correcting the mechanism may repeat the failure.
Choose the repair route from access, steel, heat treatment, coating, tolerance, appearance, and service plan. Options may include replacing an insert or pin, re-machining to a defined oversize and fitting a new component, approved welding and re-machining, recoating, or rebuilding a local feature. Identify risks such as distortion, hardness change, texture mismatch, and altered cooling. Preserve removed parts and certificates when required.
Inspect the repaired tool against the baseline, then run a production-intent trial with the approved resin. Compare fill and process signatures, parts by cavity, dimensions, flash, gate, appearance, and function. Customer-specific requirements determine notification, deviation, or resubmission. Update the drawing, bill of material, spare list, maintenance plan, and tool history.
For an RFQ, provide exact resin grade and glass content, annual shots, cavitation, critical/appearance features, process location, mold-life expectations and definition, maintenance access, receiving standards, and approval requirements. Ask the toolmaker to return a wear map, steel/heat-treatment/coating rationale, replaceable insert strategy, baseline measurements, inspection intervals, spares, and re-release plan.
Do not promise “wear-proof” tooling. The defensible objective is controlled wear: known high-risk zones, measurable baselines, planned service, recoverable geometry, and cavity-specific detection before product requirements are lost.
Conclusion
Manage glass-filled resin wear by mapping the melt and mechanical load paths, designing serviceable high-risk components, and capturing a measurable tool-and-part baseline. Inspect by cycles and condition, trace signals by cavity, and revalidate every repair that can affect the approved product or process.