
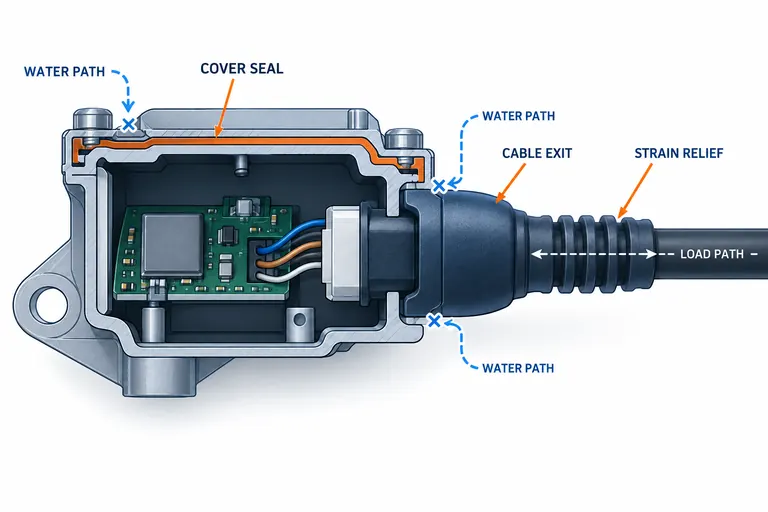
A sensor housing can have an apparently robust perimeter seal and still leak or fail at the cable exit. The same region must often stop water, retain the cable or overmold, manage bending and pull loads, protect terminations, tolerate thermal expansion, and remain moldable. Treating it as a cosmetic boot leaves critical interfaces undefined.
Design the housing joint, cable exit, seal path, and mechanical load path together. Specify mating materials and tolerances, prevent cable loads from reaching electrical joints, and validate the complete assembled sensor through the customer’s environmental and functional sequence. Do not promise an IP level from geometry alone.
How this guide fits the sensor set. This guide is the hub for the sensor-housing set on this site. It owns one decision: which cable-exit architecture to choose for a sensor housing — connector, gland, grommet, backshell, overmold, or potting — and how sealing and strain relief work together at that exit. The four companion guides each own a different decision; use them where the question changes, not as alternative answers to the same question.
| Guide | Owns this decision | Use it when the question is… |
|---|---|---|
| Automotive Sensor Housing Tolerances: What to Define Before Tooling | The housing’s dimensional definition before tooling: datum scheme, critical features, resin grade and moisture state, and the measurement method and conditions for each critical feature | "What must the drawing freeze before steel is cut?" |
| This guide — Cable Exit and Sealing Interface Design | The cable-exit architecture and the sealing-plus-strain-relief system at the exit | "How does the cable leave the housing without leaking or loading the terminations?" |
| Automotive Sensor Housings for Potting: Fill Access, Air Release and Cure Stress | Potting as one exit architecture, in depth: fill access, air release, venting, cure stress, and the housing features that make a module dispensable, inspectable, and validatable | "We chose potting — how must the housing be designed so the compound can actually fill, vent, and cure without stressing the electronics?" |
| Leak Testing Molded Automotive Housings: Fixtures, Conditions and False Failures | The leak test as a measurement method for molded housings generally — fixture design, pressure decay, stabilization, and separating false failures from real leaks | "How do we test whether the housing actually seals, without the fixture or the temperature fooling us?" |
| Automotive Sensor Brackets: Mounting Datums, Assembly and Service Loads | The bracket as a separate mounting part: vehicle datums, load paths, and moldable structure that hold the sensor in position | "Where does the sensor sit in the vehicle, and how does it stay put under load?" |
Bracket vs. housing — the boundary. The bracket and the housing are different parts answering different questions. The bracket (657)
is the mounting structure: it seats in the vehicle on real pads, holes, slots, pins, or bushings, constrains the sensor’s position against vehicle references, and carries assembly and service loads — fastener torque and clamp, connector insertion, harness pull, vibration, impact, thermal growth, and service handling — through supported plastic geometry into vehicle structure. The housing (284, this guide, 523) is the enclosure around the sensor and its electronics: it protects the sensing element, carries the connector and cable interfaces, and seals the cable exit against the environment. A bracket does not seal — sealing is the housing’s job, decided here and proven by the leak test in 514. A housing does not locate the sensor in the vehicle on its own — that is the bracket’s job, and the housing’s own tolerance pack in 284 treats the bracket as a mating interface (a bracket may control the housing’s orientation, and housing surfaces contact the vehicle bracket). If the failure is "the sensor moved, tilted, or lost alignment," start with the bracket guide; if the failure is "water or contamination got in at the cable exit," start here.
Draw a complete interface and leakage-path map
Identify every boundary from the environment to the electronics: cover-to-base joint, molded housing wall, insert or terminal interface, cable jacket to overmold, overmold to rigid housing, individual wire seals, potting, vents, and fasteners. Mark which feature is the primary barrier, which is secondary, and where drainage or pressure equalization is intended.
For each boundary, record material pair, geometry, tolerance, surface condition, compression or bond mechanism, assembly method, and expected movement. Thermal expansion differences can open a joint or stress a bond. A cable can pump at an interface during vibration. Capillary gaps, weld lines, parting-line mismatch, flash, contamination, and scratches can create paths invisible in nominal CAD.
The cable exit also needs a mechanical map. Trace pull, push, twist, bend, and harness reaction loads from cable jacket through the strain relief and housing attachment. Electrical termination should not be the structural anchor. TE’s sealed connector backshell explanation separates the primary connector seal, wire sealing, backshell engagement, and strain relief, showing why a sealed path is a system rather than one feature (TE Connectivity HDSCS backshells).
State the actual environmental requirement and governing customer method. ISO 20653 or another test reference can define an enclosure test, but the required degree, mounting orientation, sample conditioning, operation, and post-test function remain program-specific. Do not label a new housing IP67 or IP6K9K because a similar connector family carries that rating.
Choose the cable-exit architecture by service and manufacturing needs
Common approaches include individual wire seals and a connector, a cable gland or compression seal, a molded elastomer grommet, a rigid backshell plus seal, low-pressure encapsulation, potting, or direct overmolding around a cable and insert. Each combines sealing, serviceability, tooling, and process control differently.
A removable connector supports service and harness modularity but adds mating and rear-seal interfaces. A pigtail can reduce one connector interface but creates cable-exit and termination-control needs. Potting can fill internal voids yet adds material, cure, adhesion, contamination, and repair constraints If potting is the architecture chosen, the housing design that makes it work — fill access, air-release paths, vent placement, cure stress, and inspection access — is covered in detail in Automotive Sensor Housings for Potting: Fill Access, Air Release and Cure Stress; this guide decides whether to pot, that guide designs how to pot. Overmolding can integrate shape and strain relief, but adhesion to cable jacket and housing, insert placement, temperature, pressure, and flash must be controlled.
Use a selection matrix:
| Architecture | Useful when | Critical inputs | Main verification focus |
|---|---|---|---|
| sealed connector | serviceability and modular harnessing matter | compatible connector, wire seals, backshell, mating rules | mating, wire seal, latch, vibration and ingress |
| compression gland/grommet | cable size and wall interface are controlled | cable diameter, hardness, compression and housing tolerance | compression retention, pull, thermal movement and leak |
| direct overmold | compact integrated exit is required | jacket compatibility, insert support, process temperature | bond/interlock, flash, cable damage and flex durability |
| potting/encapsulation | electronics and terminations need environmental protection | resin compatibility, cure, void control and vent strategy | fill, adhesion, thermal cycling and electrical function |
The choice should come before detailed tooling. Switching architecture after housing CAD release can move datums, envelope, assembly steps, test fixtures, and supplier responsibility.
Design sealing and strain relief as cooperating but distinct functions
A seal needs controlled contact, compression, bond, or encapsulation. Strain relief needs a gradual transfer of mechanical load. One elastomer region can contribute to both, but the geometry that maximizes grip can create stress or a leakage path. Define each function independently, then check their interaction.
For a radial cable seal, control cable diameter, ovality, jacket surface, seal interference, housing bore, assembly lubricant, and compression set. For an overmold bond, specify exact jacket and overmold materials, cleanliness, preheat or preparation, and mechanical interlock if required. For a perimeter gasket, establish gland fill, squeeze, tolerances, fastener load, and stops that prevent over-compression.
Bend relief should extend far enough to move curvature away from the rigid exit and termination, with smooth wall and rib transitions. It must fit the vehicle routing envelope at cable tolerance. A 90-degree exit can solve packaging but changes pull and bend directions. Fischer Connectors’ cable-assembly guidance notes that overmolds and heat-shrink may assist sealing and bend relief, while dedicated clamps or collets provide mechanical strain relief; the exact connector design governs the solution (Fischer cable assembly white paper).
Keep sharp gate vestige, flash, and parting lines away from seal contacts and cable flex surfaces. Support inserts against molding pressure. Vent trapped regions without bypassing the seal. If welding closes the housing, locate the cable so welding energy and clamping do not disturb the exit.
Control tolerance, process, and assembly at the same time
Flexible components can mask variation during visual inspection. Define measurable datums on rigid features and functional gauges for cable position, exit angle, and mating envelope. Control seal dimensions in the state relevant to assembly. Identify cavity and lot because shrinkage, cure, and hardness variation can affect compression.
For insert or overmolding, specify cable preparation length, strip dimensions, conductor position, jacket cleanliness, fixture location, pull-back prevention, and detection of missing or misoriented inserts. Record material condition, temperatures, pressure, cure or cooling, and transfer time. A process that damages insulation internally may still produce a perfect exterior.
Housing processes such as injection molding, welding, adhesive bonding, and potting need compatible sequences. Mold release or contamination can undermine later bonding. Trapped air in potting can connect to the cable path. Excess welding flash can enter a seal region. Establish cleanliness and maximum wait times where supported by material/process guidance.
Tolerance analysis should include housing, seal, cable, terminals, PCB, cover, and fixture. Check worst-case compression and cable alignment. When stack-up cannot guarantee function, redesign the interface or use a validated compliant feature rather than relying on operator adjustment. The tolerance pack this stack-up works from — which features are critical, which datum scheme locates the housing, and in what material and measurement state each feature is accepted — should be frozen before tooling as described in Automotive Sensor Housing Tolerances: What to Define Before Tooling; this guide controls the cable-exit interfaces against that pack, it does not replace it.
Validate the complete sensor assembly and diagnose the path
Begin with dimensional, material, and process records, then test mechanical retention and basic function. Apply the customer-defined thermal, humidity, chemical, vibration, shock, dust, water, pressure, and electrical sequences in the required order. Keep the device mounted, powered, pressurized, or connected when the specification requires it.
Test more than initial ingress. Recheck cable pull, flex, electrical output, insulation, connector function, dimensions, seal compression, and visible cracking after conditioning. A unit that stays dry but loses calibration or conductor continuity has not passed. A leak result without path diagnosis is also incomplete.
Use dye, pressure decay, sectioning, controlled submersion, or other approved diagnostic methods to distinguish cover joint, cable interface, wire path, molding defect, weld line, fastener, and vent. Diagnostic methods do not automatically equal acceptance methods; retain the specified test for release.
For a pigtail sensor, test combinations of cable-diameter limit, housing cavity, and seal lot. Apply pull and bend directions matching vehicle routing, then thermal cycle and repeat leakage and electrical checks. If failures cluster at one cable-jacket lot, investigate surface, diameter, and bond preparation before changing the entire housing design.
Validation sequence for the assembled sensor
No test parameters are stated below — no pressures, durations, temperatures, pull forces, or IP levels. Every limit, sequence, and acceptance criterion comes from the customer specification and governing test method for the actual program. The table orders the work; it does not set the requirements.
| Step | What to do | Evidence to record | Where the detail lives |
|---|---|---|---|
| 1. Records first | Dimensional, material, and process records for the housing, seal, cable, terminals, and (where potted) compound lot, mix, and cure — before any environmental test | Drawing revision, cavity/lot identity, material condition, process temperatures and times | This guide, "Control tolerance, process, and assembly at the same time" |
| 2. Mechanical retention and basic function | Cable pull, push, twist, and bend in the vehicle routing directions; connector mating and latch function; basic electrical function | Pull/bend directions applied, retention result, electrical output before conditioning | This guide, "Design sealing and strain relief as cooperating but distinct functions" |
| 3. Customer environmental and functional sequence, in the required order | Thermal, humidity, chemical, vibration, shock, dust, water, pressure, and electrical sequences as the customer specification orders them, with the device mounted, powered, pressurized, or connected when the specification requires it | Sequence order followed, mounting and operating state during each step, sample identity | Customer specification; the governing test method (for example ISO 20653 for road-vehicle ingress degrees) defines the test, not this guide |
| 4. Post-conditioning rechecks | After conditioning, recheck cable pull, flex, electrical output, insulation, connector function, dimensions, seal compression, and visible cracking | Before/after comparison for each check — a unit that stays dry but loses calibration or conductor continuity has not passed | This guide, "Validate the complete sensor assembly and diagnose the path" |
| 5. Leak-path diagnosis if a leak is found | Use dye, pressure decay, sectioning, controlled submersion, or another approved diagnostic method to distinguish the cover joint, cable interface, wire path, molding defect, weld line, fastener, and vent | Which path leaked, and the evidence that separates it from the other paths; retain the specified test for release — a diagnostic method does not automatically equal an acceptance method | Leak Testing Molded Automotive Housings: Fixtures, Conditions and False Failures for fixture discipline, stabilization, and false-failure diagnosis |
| 6. Production monitoring, agreed separately from qualification | Validated process parameters, seal presence and position checks, cable-pull sampling, and pressure-decay or another correlated method, plus periodic verification | Correlation demonstrated on the actual assembly, and the limit that follows from it — a convenient test is not automatically sensitive to the failure modes found during qualification | Leak Testing Molded Automotive Housings: Fixtures, Conditions and False Failures for fixture-blank and reference-part checks |
Read the sequence as a chain, not as six independent tests: a seal that passes Step 3 but fails Step 4 has not passed, and a leak found in Step 5 is not a verdict on the housing until the path is identified — a fail that follows one fixture seal points at the measurement system, while a fail that follows one cavity, weld condition, or localized product surface points at the product or process. Do not raise a limit because failures are difficult to locate, and do not modify mold steel until the leak location and mechanism are supported.
Put responsibility and acceptance into the RFQ
Provide CAD, controlled drawings, cable and terminal specifications, PCB or insert envelope, mating components, seal architecture, mounting, environmental duty, electrical function, annual volume, validation sequence, sample quantities, PPAP scope, and customer-specific requirements. Name who supplies cable, terminals, electronics, potting, seal, fixtures, and laboratory tests.
Require the supplier to identify the primary and secondary barriers, load path, exact materials, process route, unsupported assumptions, tool shutoffs, inspection method, leak-test concept, and external validation. If a claimed ingress rating depends on a purchased connector, require the exact compatible components and assembly instructions.
Agree production monitoring separately from qualification. A formal ingress sequence may be destructive or too slow for routine use. The control plan can instead use validated process parameters, seal presence and position checks, cable-pull sampling, pressure-decay or another correlated method, plus periodic verification. Correlation and limits must be demonstrated on the actual assembly; a convenient test is not automatically sensitive to the failure modes found during qualification. The leak-test concept the supplier proposes should follow the fixture and correlation discipline in Leak Testing Molded Automotive Housings: Fixtures, Conditions and False Failures — fixture seals that can be challenged separately, blank and reference-part checks, and stabilization controlled before any limit is set. And where the RFQ’s mounting input depends on a separate bracket, define that bracket interface from Automotive Sensor Brackets: Mounting Datums, Assembly and Service Loads rather than from the housing drawing alone: the bracket’s datums and load paths decide whether the mounted sensor holds its position, and the housing’s cable exit cannot be validated against a mounting condition that was never defined.
Conclusion
Treat the sensor cable exit as both a sealing system and a mechanical load-transfer system. Send AutoMoldingPro the housing CAD, cable specification, mating components, environment, load directions, annual volume, and validation requirements through the contact page for DFM and quotation review.